
Reproduction Design Aspects and Construction Techniques
The reproduction shape and patterning were not modified substantially to adapt to a modern body. The fit model’s corseted bust and waist measurements (prior to wearing the corset) were 39½" and 31", respectively. Once the fit model was corseted with an 1850s replica corset designed and manufactured by the company Redthreaded, new measurements were taken. The measurements of the fit model wearing the corset were 37 3/4" at the bust and 30" at the waist. After these measurements were obtained, a dress form was padded prior to draping the pattern for the reproduction.
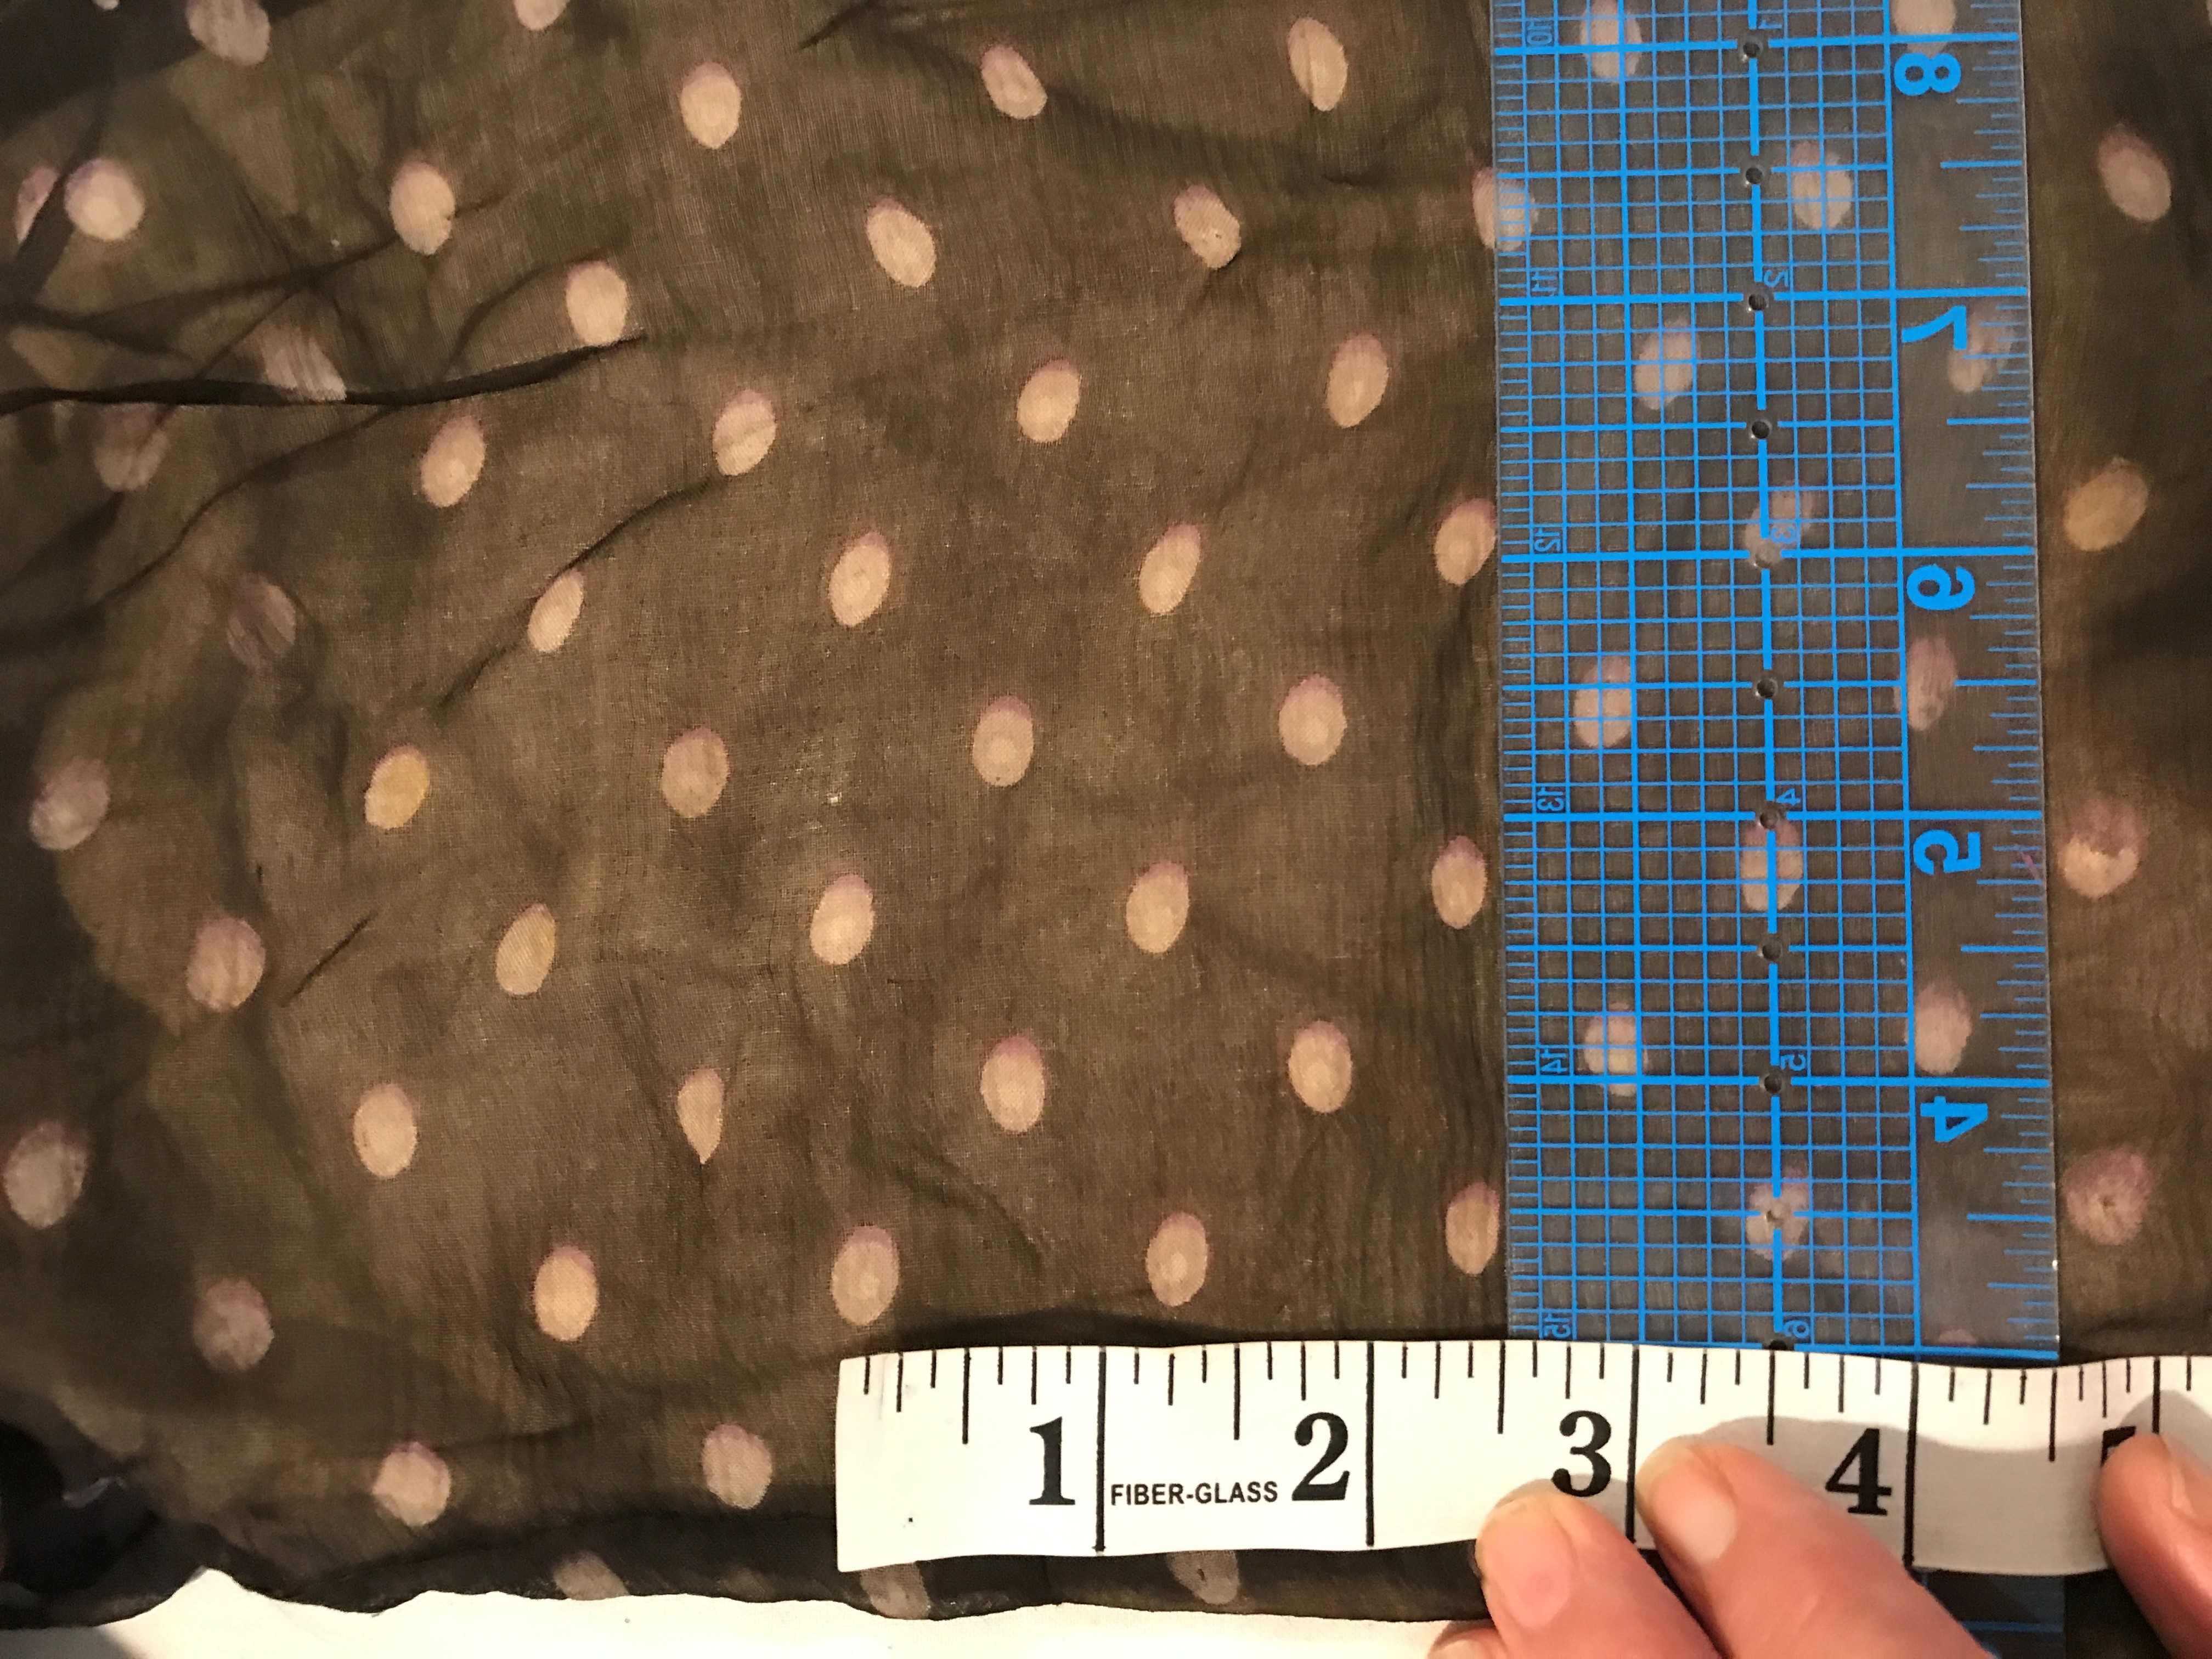
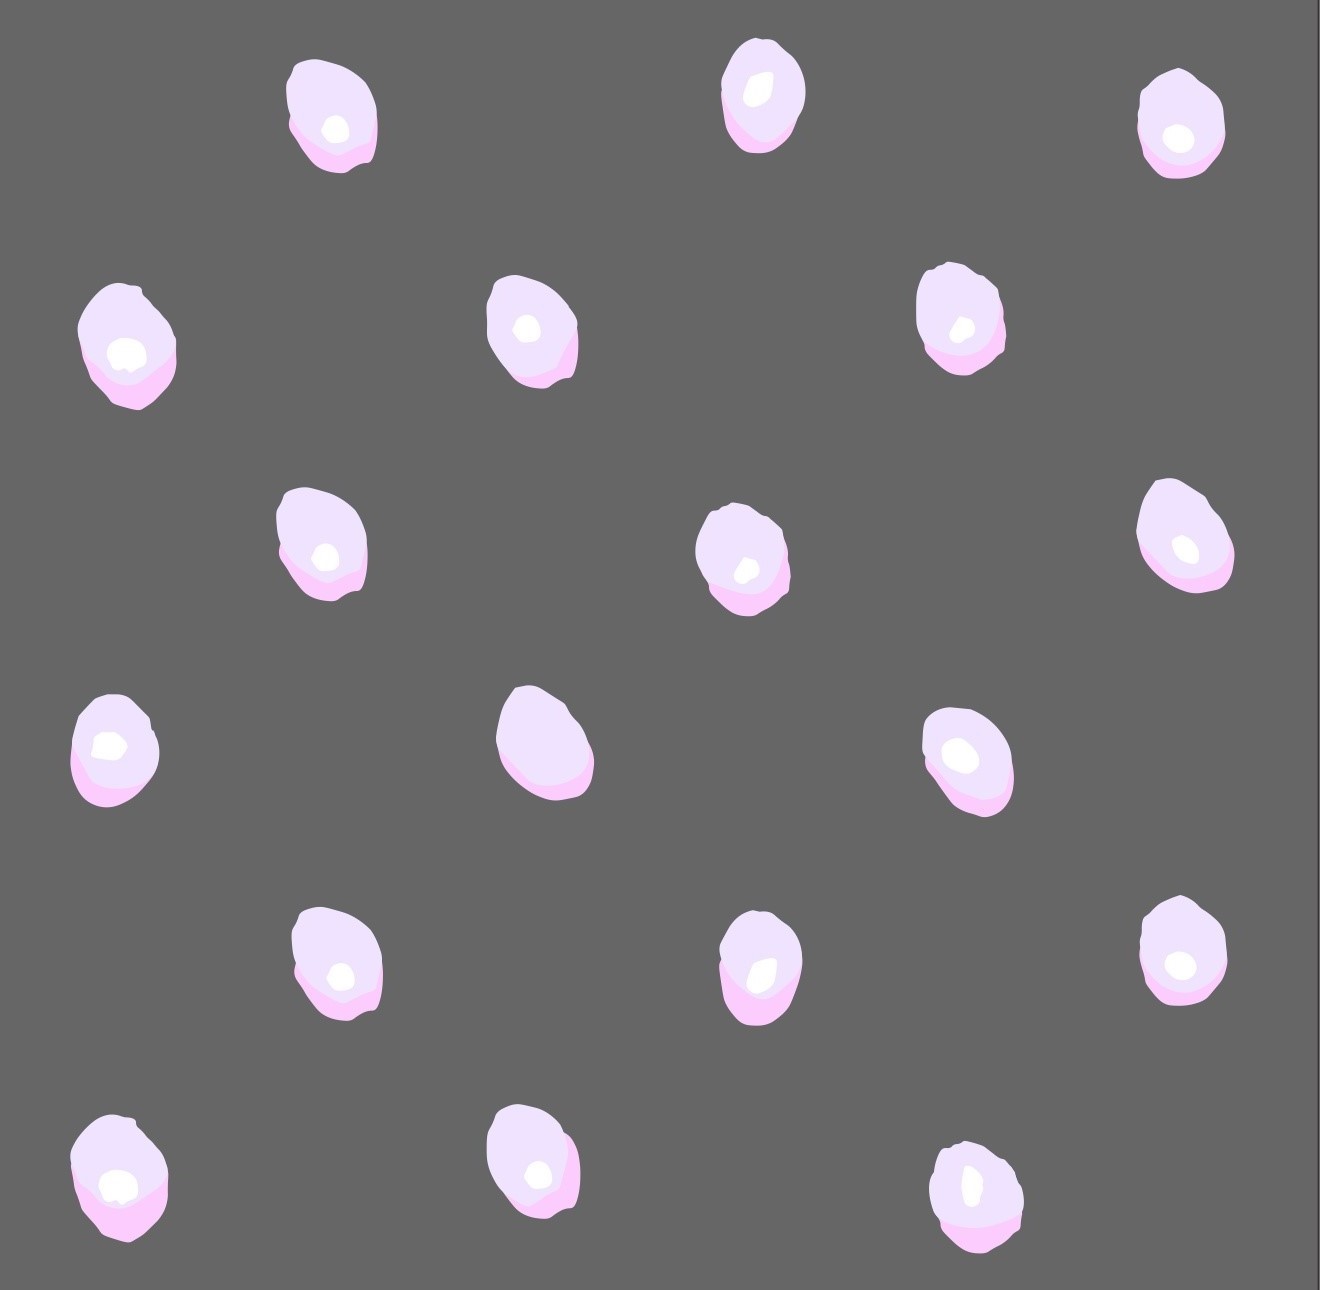
The most challenging issue that I encountered for this reproduction was sourcing. The printed silk fabric was not a simple polka dot fabric as I originally thought. I could not find a fabric close enough to the print available for purchase. I could have just chosen to use a basic black silk with white polka-dots but trying to have fabric closer to the original bodice was important. Since it was not available for purchase, the oval print and floral border printed fabric were reconstructed using CorelDraw Graphic and Adobe Illustrator software. The process for this included taking digital images of the print and border fabrics and using these images to trace or to modify an existing image into a repeatable pattern. The oval printed fabric was digitally hand drawn to match the original print, using a photograph of the original fabric. The process was repeated to create a larger image file.
Figure 1: Original Silk Chiffon |
Figure 2: Digital Image |
Figure 3: PrintedPolyester Chiffon |
 |
 |
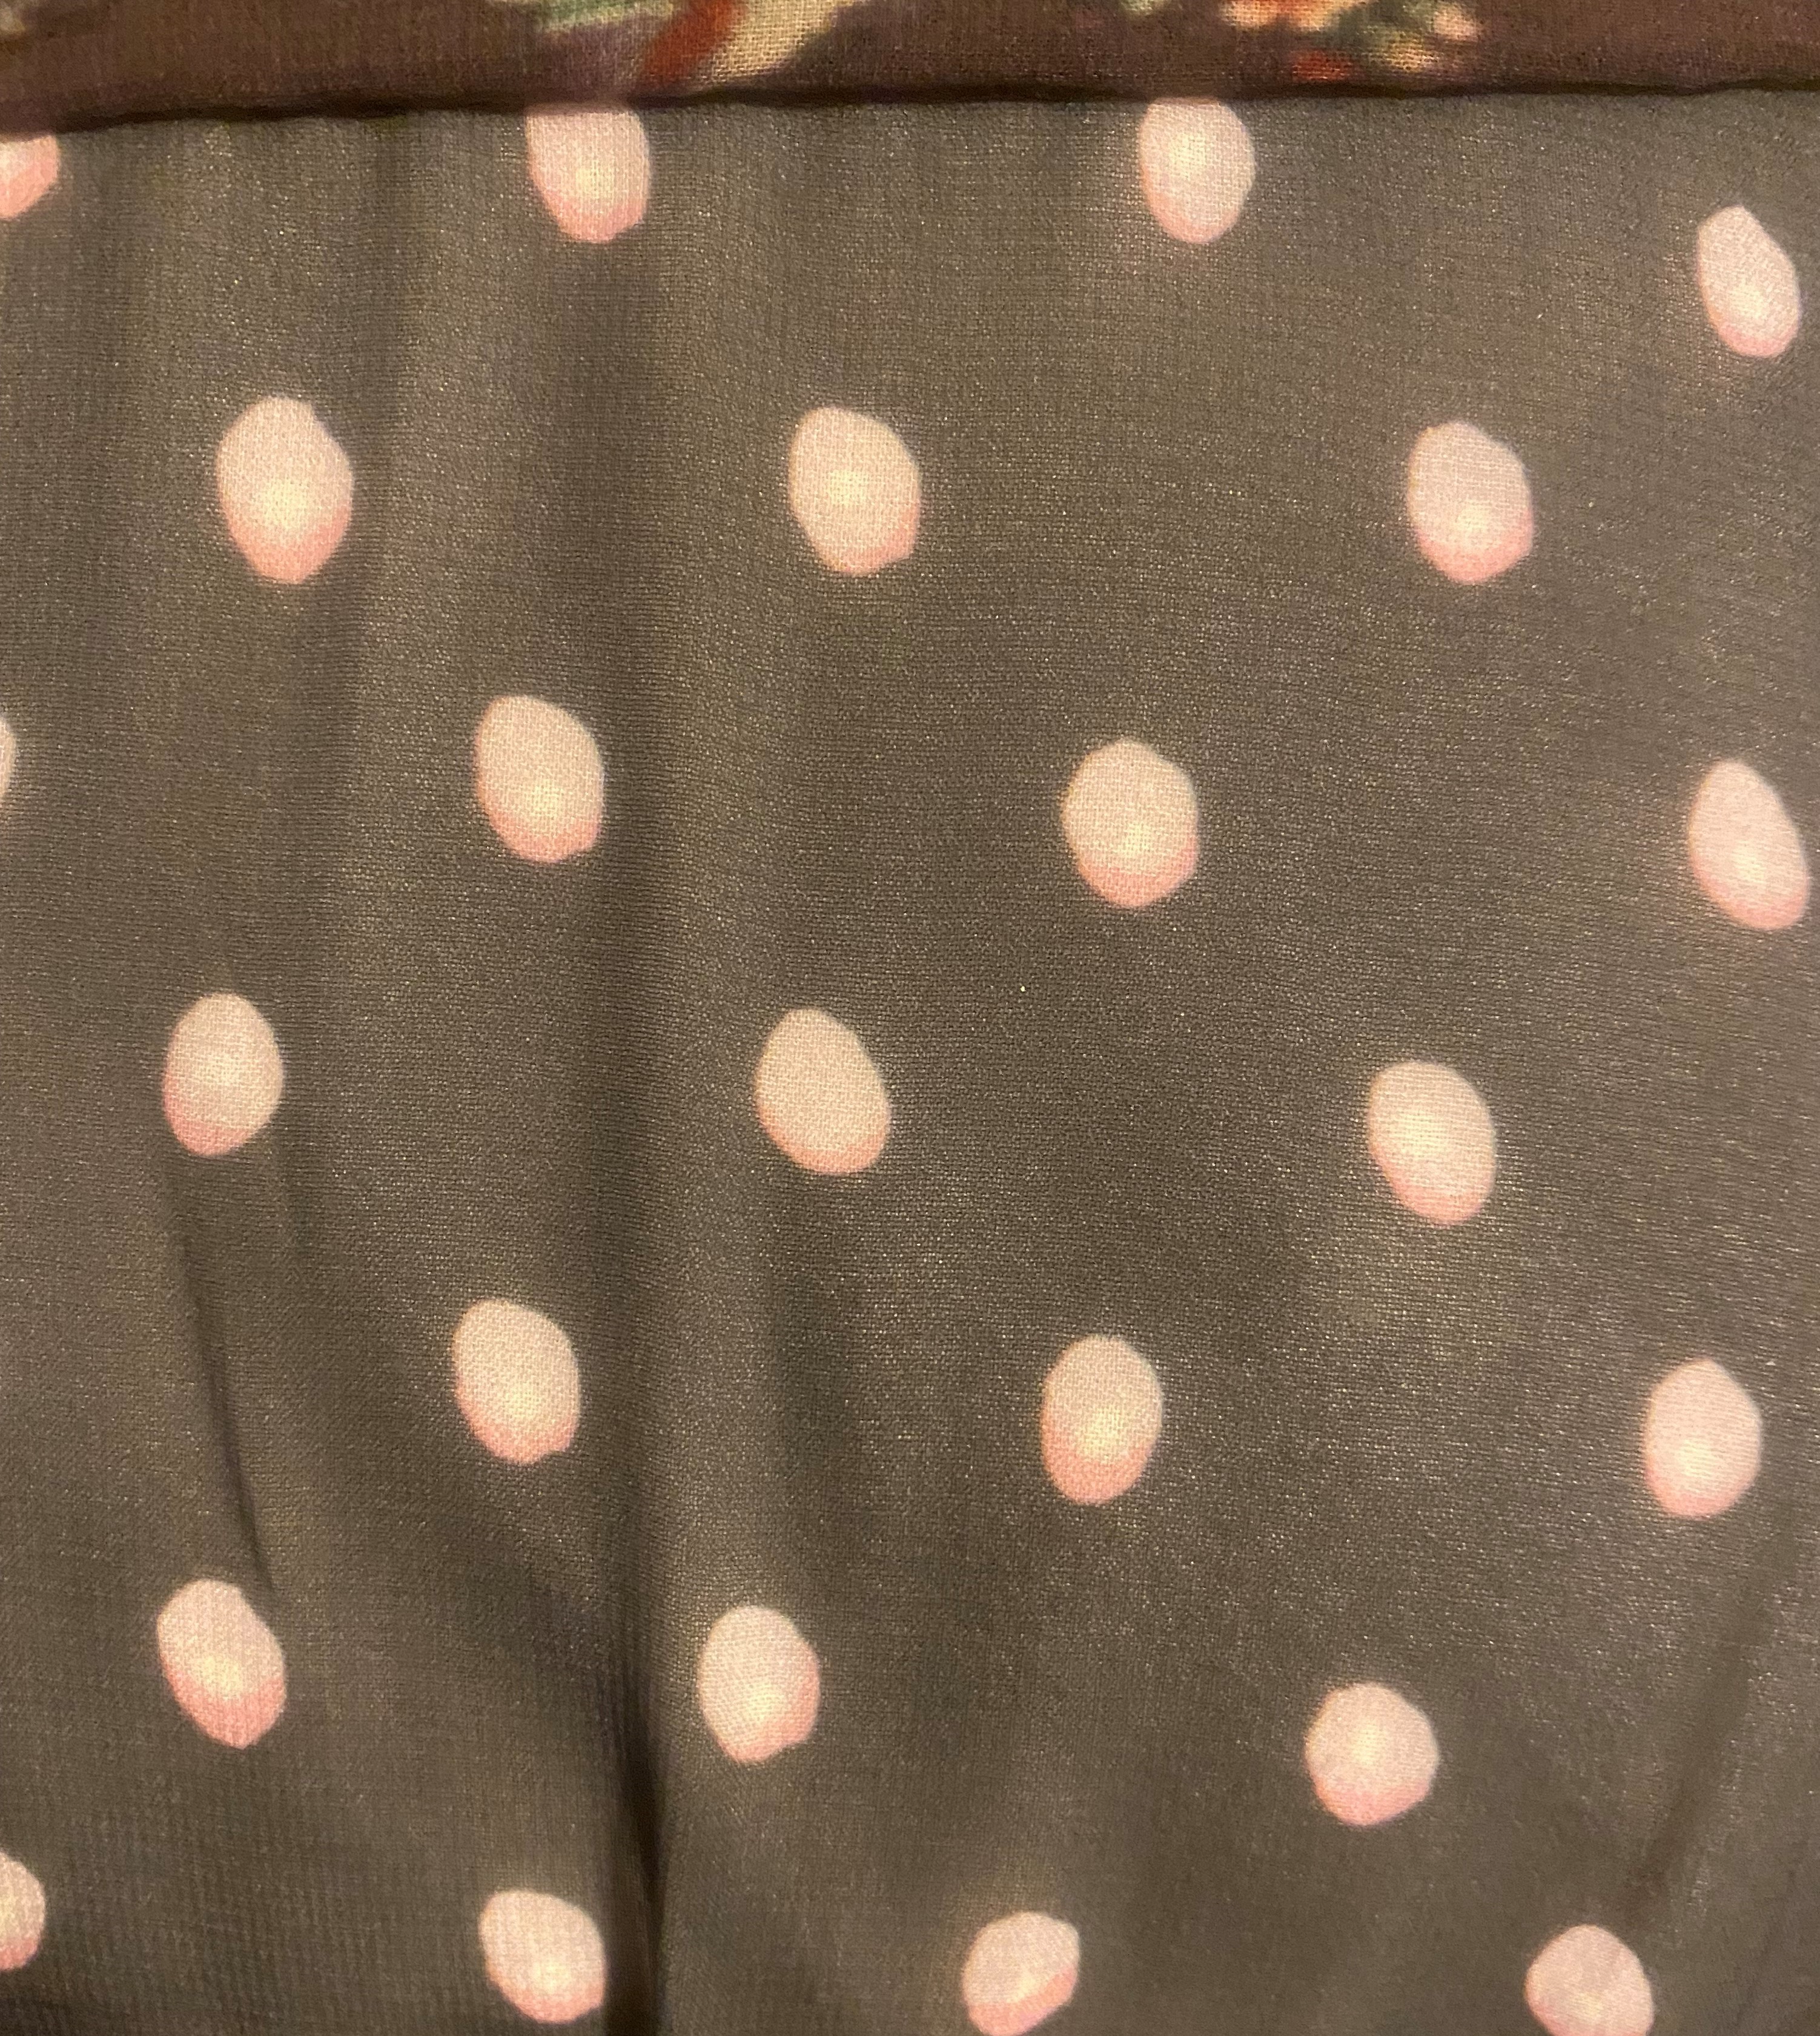 |
The floral border image was created using an image of an online digital image of a piece of floral wallpaper, then altered using Adobe Illustrator to be similar the yoke historical border print. Both files were exported as .jpg files and sent to the fabric printer. Once the fabric and border were created, the images were sent to Spoonflower, Inc. for printing on three types of fabric to review the hand of the printed fabric. Also, multiple attempts and samples were created before the correct scale and hand were obtained. The final fabric choice is a polyester chiffon for both the fashion fabric and border fabric. The cost for the printed fabric was $27.00 a yard.
Figure 4: Fabric Border Print Preparation Diagram for Spoonflower, Inc. |
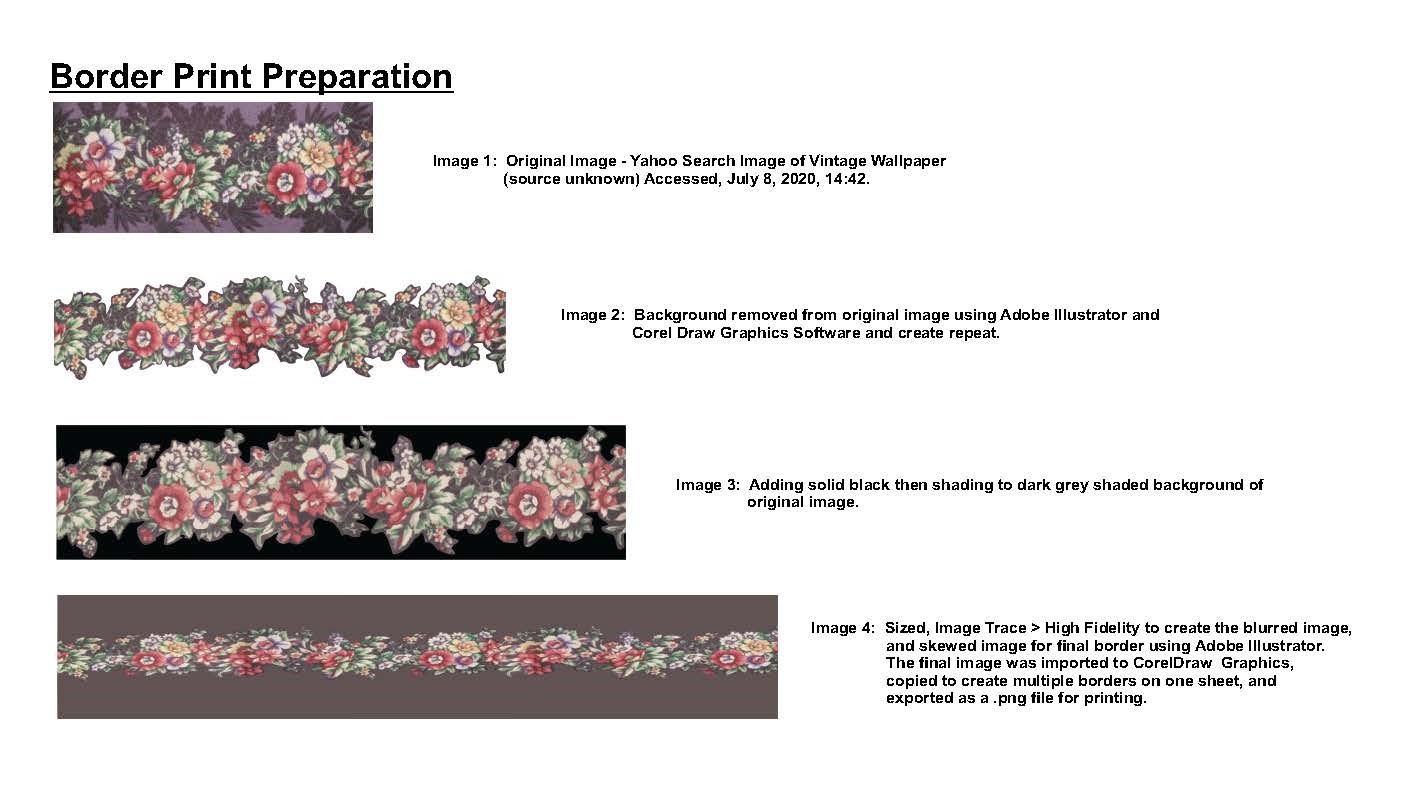 |
In addition, the purchase of a natural coated linen in the same hand was unavailable, so a fine white coated linen was purchased from Burnley & Trowbridge Co. The fabric was dyed using tea bags to get a natural color. The dyeing process of the fabric changed the hand slightly, so starch was added manually to the fabric.
Reproduction Process
To create this bodice for a contemporary body appearing in a theatrical performance a few modifications were necessary. First, a nude souffle net was chosen to line the upper yoke poly chiffon as a stabilizer. Secondly, the original finishing at center back used the selvedge of the silk fabric and was altered. This was due to the printing process; no selvedge edge is created so a fine baby hem was used where the selvedge edge finishes were found. Also, the center back closures, #4 silver and black hooks and eyes, are more substantial than those on the original historical bodice. Larger flat brass hooks and eyes were not available. Machine stitching was utilized were possible in the construction; however, due to the delicate nature of the fashion fabric and the layering construction of the bodice, a large portion of the stitching was completed by hand. This hand stitching was then reinforced by machine if and where possible. Seams were finished with a machine serge, pinked, cross stitched, overcast, or bound with the thread piping/cording.
Bodice Pattern Creation and Construction
Attempts to draft the pattern off the original bodice was challenging for multiple reasons: the lack of seaming, the small size of the bodice, and a desire to avoid scarring or damaging the silk fabric. To overcome these challenges, portions of the patterns were obtained by delicately pinning the bodice flat or by carefully pinning a portion of the bodice to a dress form and lightly tracing the seams and darts onto silk organza. Most of the measurements were obtained by laying the bodice flat. Once the rough tracing was complete, additional angles and measurements were taken and used to create the front and back of the final bodice pattern.
The small nature of the bodice with a bust measurement of 28" and waist measurement of 23" is what would be consistent with a modern 7G Industry Grade Girls Full Body Dress Form (613A) manufactured by PGM Dress Form, Inc. Based on their dress forms these measurements are the size of a modern girl the age of 7. To adapt the pattern for my fit model, a size 10 dress form was padded to their measurements and the inner bodice was draped on the dress form. A flat pattern was taken off the drape, the over bodice was patterned, slashed, and spread to create the gathering at center front and center back, and cut. A mockup was created using fabric with a similar hand, and the fullness was adjusted to mimic the original bodice. The yoke pieces were traced flat and adjusted using the fit model’s measurements.
Construction
The under-bodice bone casing at center front was machine stitched, the darts were closed to create the bone casings, and the shoulder seams are closed, leaving the side back seams open. The outer bodice front is flatlined to the under-bodice front and back pieces at the yoke, side seams, and armscye. The yoke pieces are stitched. The thread piping is stitched into the seam allowances on the flatlined outer bodice front and backs in the yoke and armscye. The yoke is stitched to the front and backs, and the side seams are closed. Four hand stitched gathering threads are placed at 1/2" apart at center front and at the center back sides. They are gathered to the marks and then secured with a top stitch through all layers. Once center front is based the faux princess seams are stitched using a 1/16" tuck on the curved princess line, then machine stitched through all layers. This creates the smoothness from the princess seam to side back. The front gathering was secured through all layers, the thread piping was stitched to the hem, turned, and finished the hem. The outer bodice and inner bodice are not connected at center back. Closures are attached to the under bodice back and in the outer bodice yoke. The neckline was finished with a 3/4" strip of the silk fabric cut on the bias. Sixteen hooks and eyes were placed at center back, and a small snap was added to secure the overlap at the yoke. Synthetic whale bone (German plastic boning) was used in place of steel to mimic the flexibility of the original baleen of the bodice.
The floral border for the yoke was stitched by hand 1 1/2" down from the yoke stitching line turned up and pressed and hand stitched just below the thread piping. This was necessary because the border had to be shaped around the yoke line and over the shoulders.
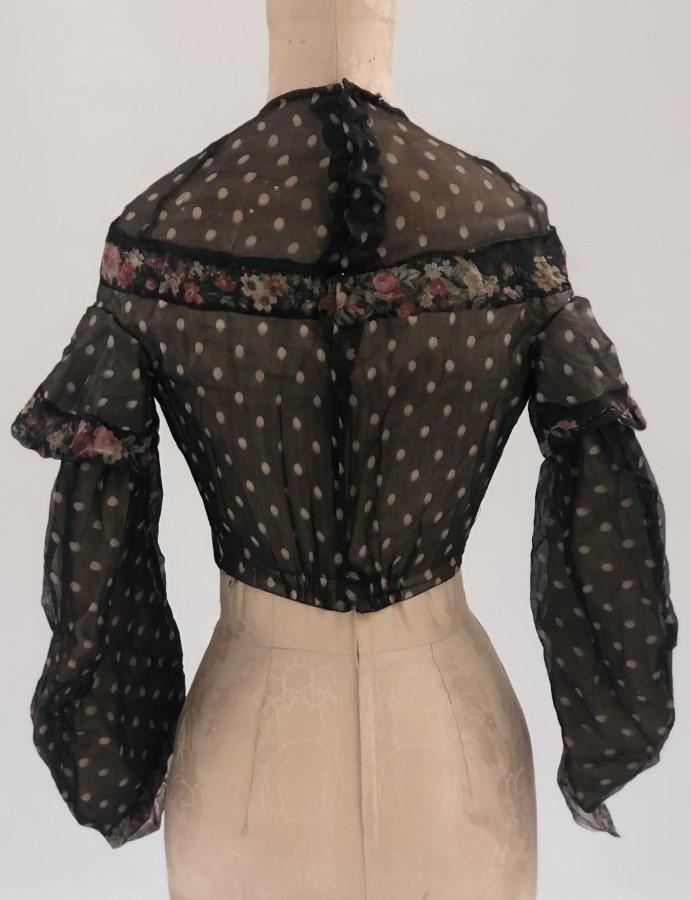
One of the main differences observed in the modern body pattern versus the 1850s bodice was the neck to shoulder point slope. As seen in the images to follow, the modern shoulder has less slope and the shoulder point has more muscular shaping, likely because modern women move their arms more than women of the 1800s.
Sleeve Pattern and Construction
I began with a two-piece inner sleeve with the over sleeve using the same pattern. The outer sleeve mockup was constructed in two pieces. At the first fitting, the sleeve length, fullness, and cap shape were modified substantially. My original pattern was scrapped and the original sleeve was thoroughly examined (removing the wrinkles and flattening it carefully) to determine how to reconstruct this sleeve. After determining that the original had two different inner sleeve shapes, I chose to create the sleeves using the right side one-piece sleeve, which is the one-piece sleeve on the fold. The outer sleeve is the same shape; however, the darts are removed and converted to seams. Once the accurate design was determined, the pattern was taken from the inner sleeve, since it was less fragile than the outer (silk) sleeve. The sleeve was delicately pinned to the cutting table and the shape was traced onto paper. The inner and outer sleeves are a trapezoidal shape with a slight curve on the inner seam.
Once the pattern was transferred, the pattern could not be cut on the fold with the addition of the gusset, so the pattern was opened to create on pattern with both the over and under sleeve on one piece like the original sleeve. A gusset was added to the pattern for theatrical purposes so the performer can raise their arms. The pattern was trued to the armscye. The inner sleeve is cut using the same pattern but marked and cut patterned individually. The top of the cap has a box pleat set back from the should seam and three pleats on the front and back radiating out and down from the box, to create the fullness at the sleeve cap and shoulder point. The flange was initially patterned using the sleeve cap seam with the pleats closed because there is only a slight amount of ease in the flange seam. The original pattern mimicked the sleeve cap line. However, when mocked-up, slashed, and spread to get the correct drape, the cap seam line drastically changed. The flange pattern was traced to paper and trued against the final sleeve pattern cap seam, with the pleats closed since there is no gathering or pleats in the flange. The flange is of the printed silk and China silk, with the border cut to the length of the outside edge, the three pieces stitched together, and bagged out. The top of the border is tucked and eased (using an easing stitch) then secured down through the China silk with a slip stitch.
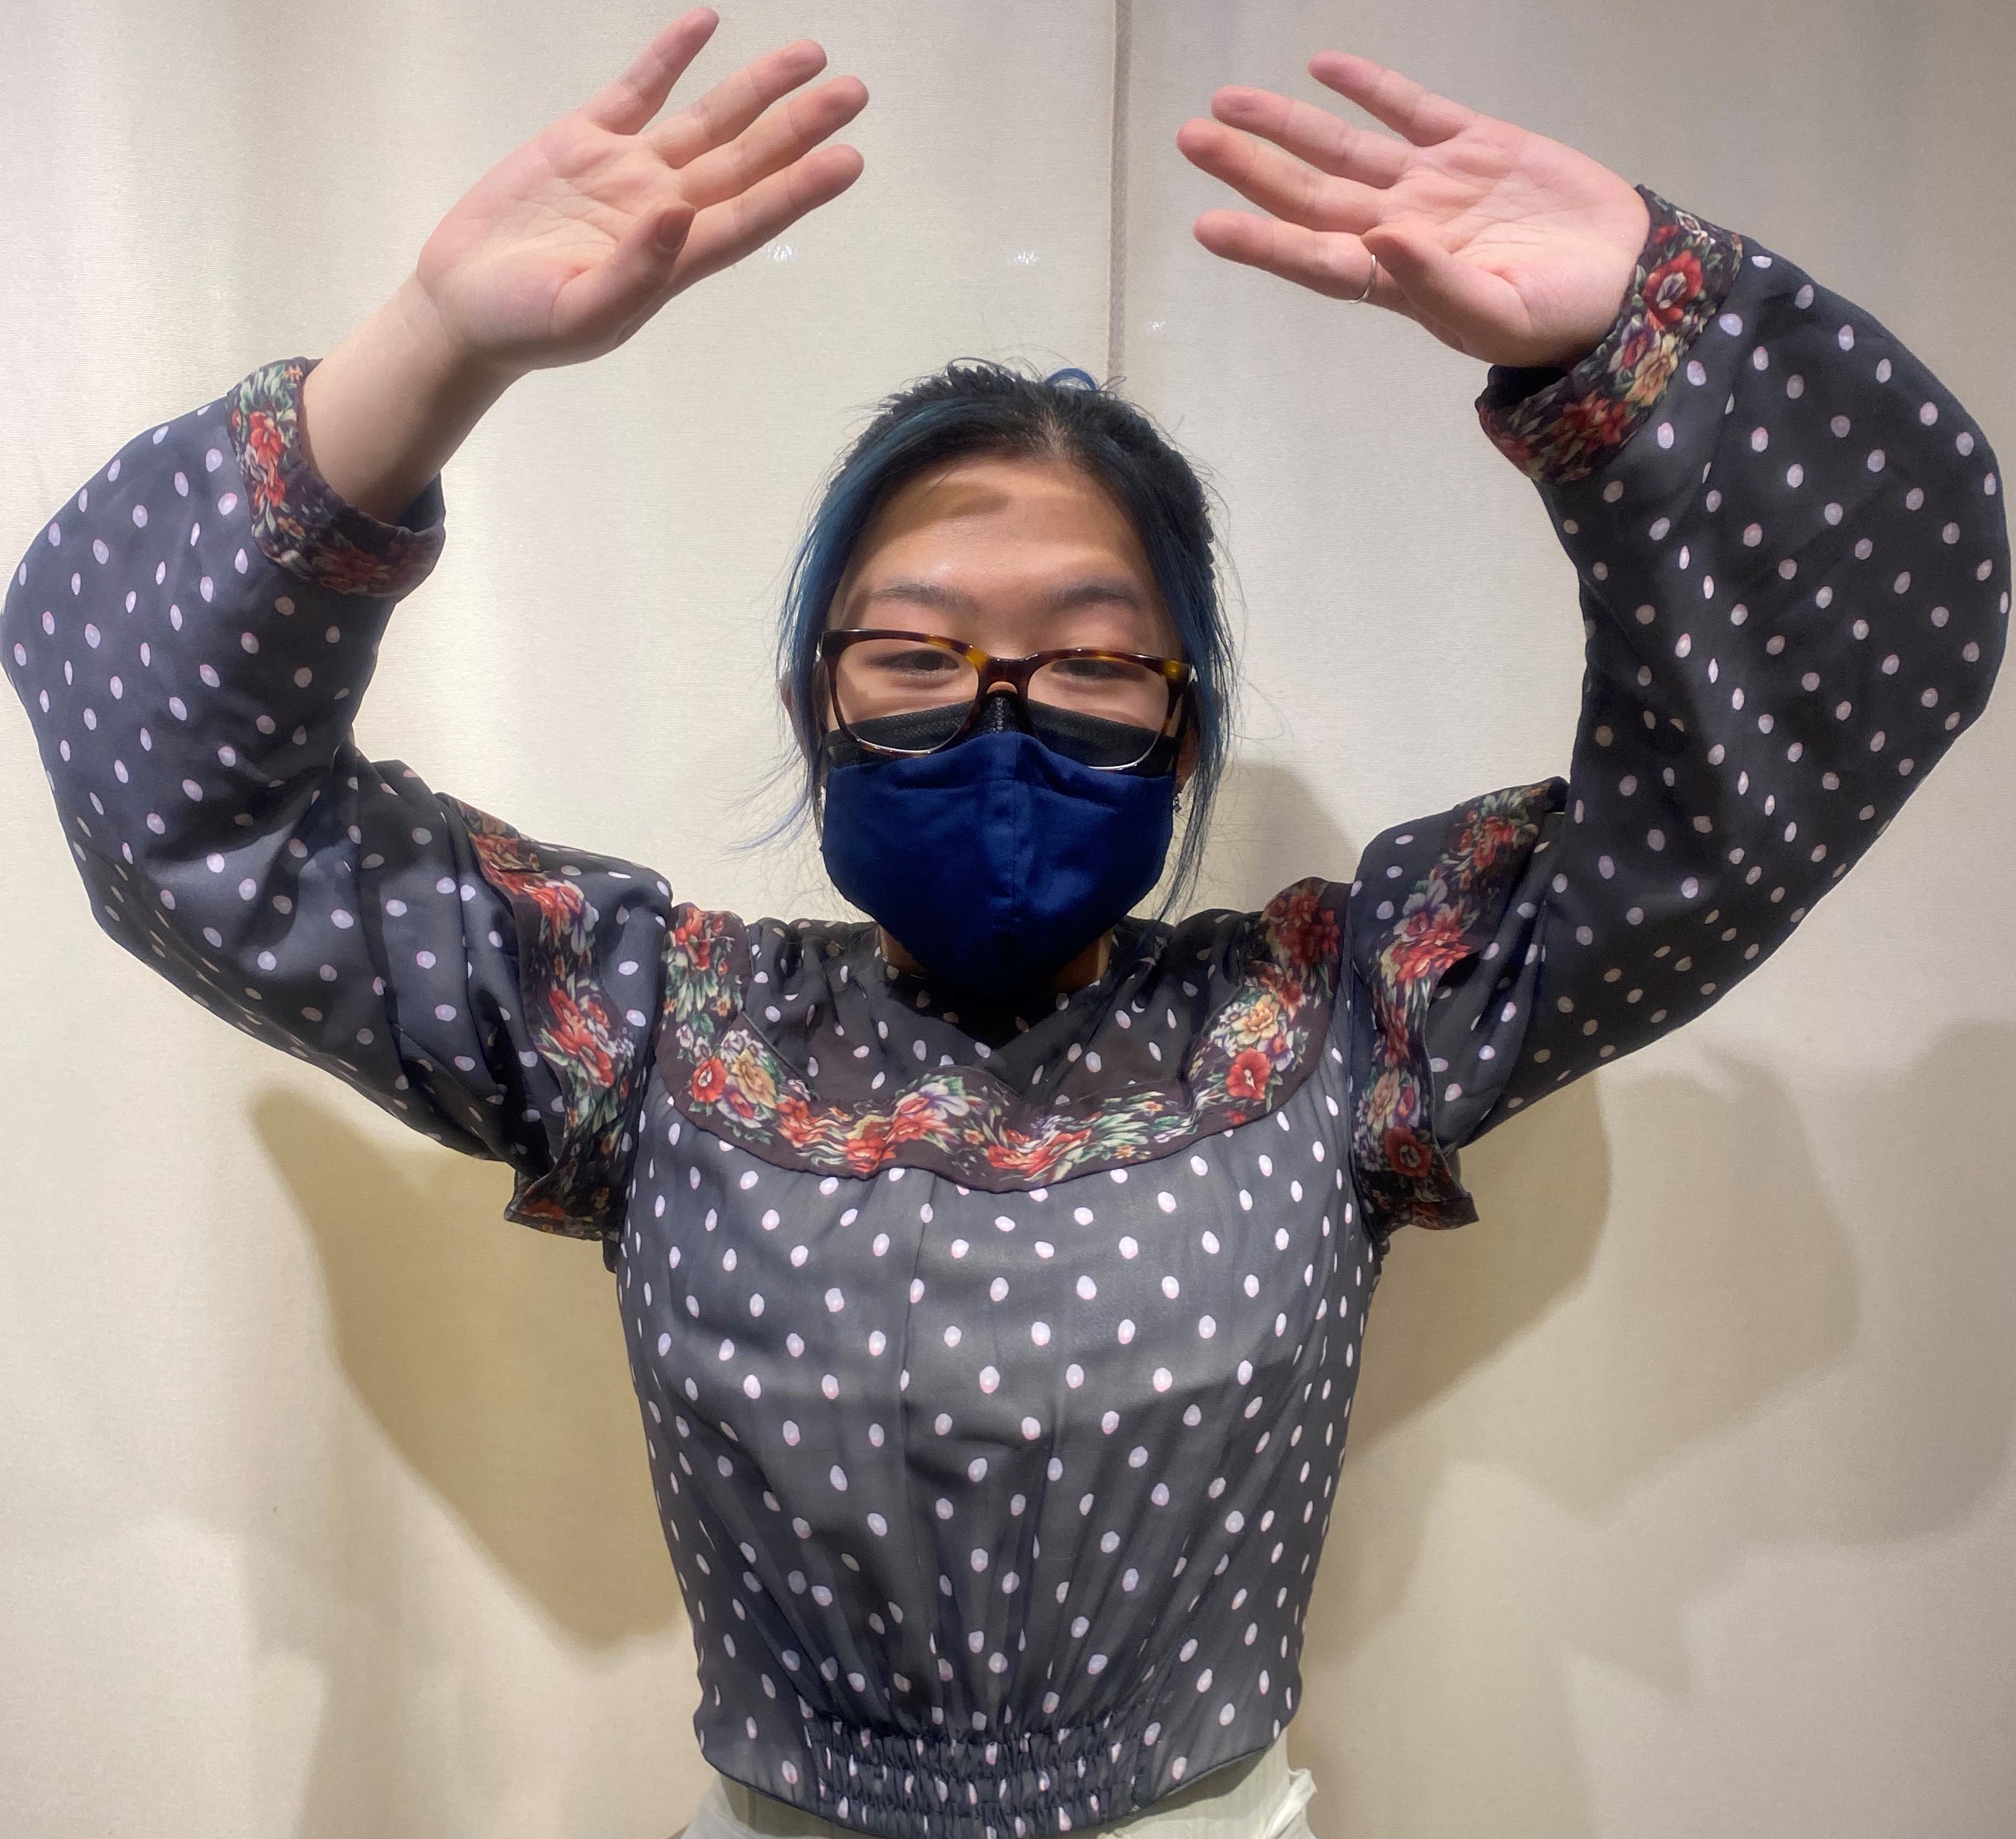
Figure 5: Completed Gusseted Sleeve
|
Figure 6: Gusseted SleevesOn Fit Model |
 |
 |
The construction of the sleeve required stitching the inner sleeve and outer sleeve individually, layering them together, and flatlining then at the cap and cuff. Then pleating the sleeve caps as one and basting the flange to the sleeve cap. The cuff is finished by stitching the floral border with a 1 1/2" seam allowance,1 1/2" up from the sleeve hem line through the inner and outer sleeve. I then turned the border in and finished with a 1" hem. Once all three layers were basted together and the sleeve was complete it was stitched into the bodice.
Sixteen hooks and eyes and one snap were added at center back and the bodice was completed.
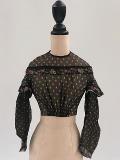
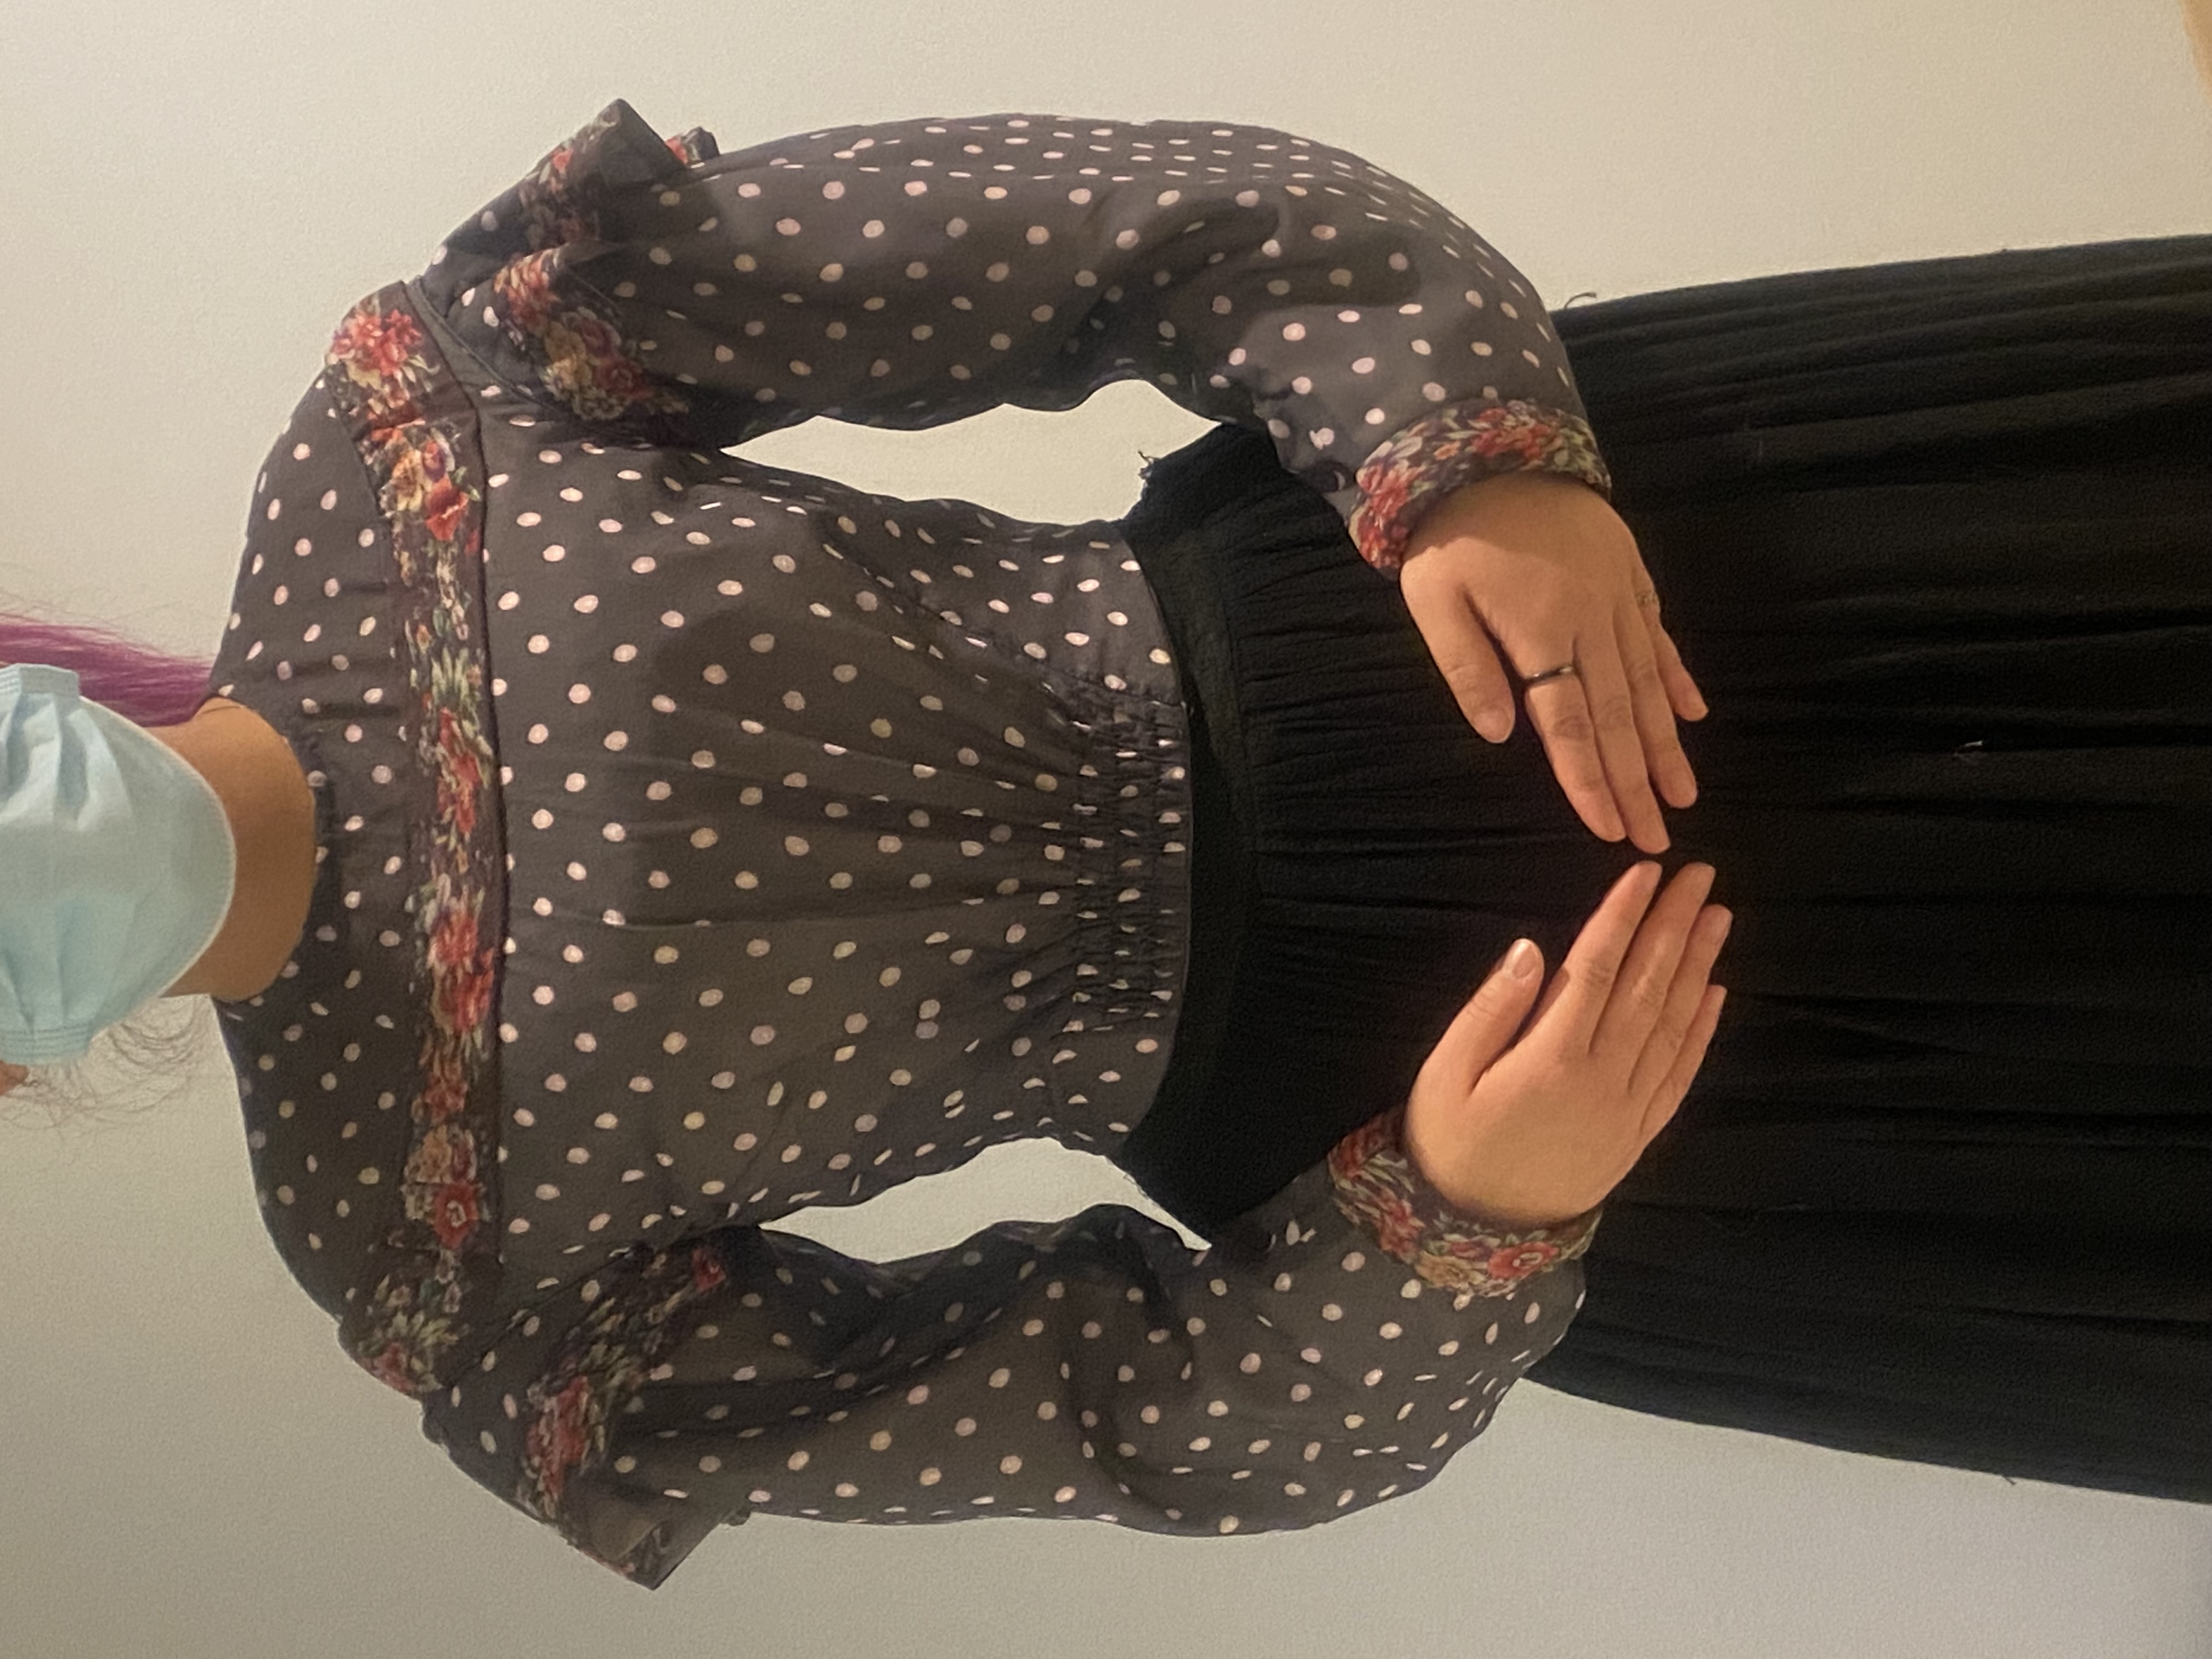
Figure 7: Reproduction Front |
Figure 8: Reproduction Back |
 |
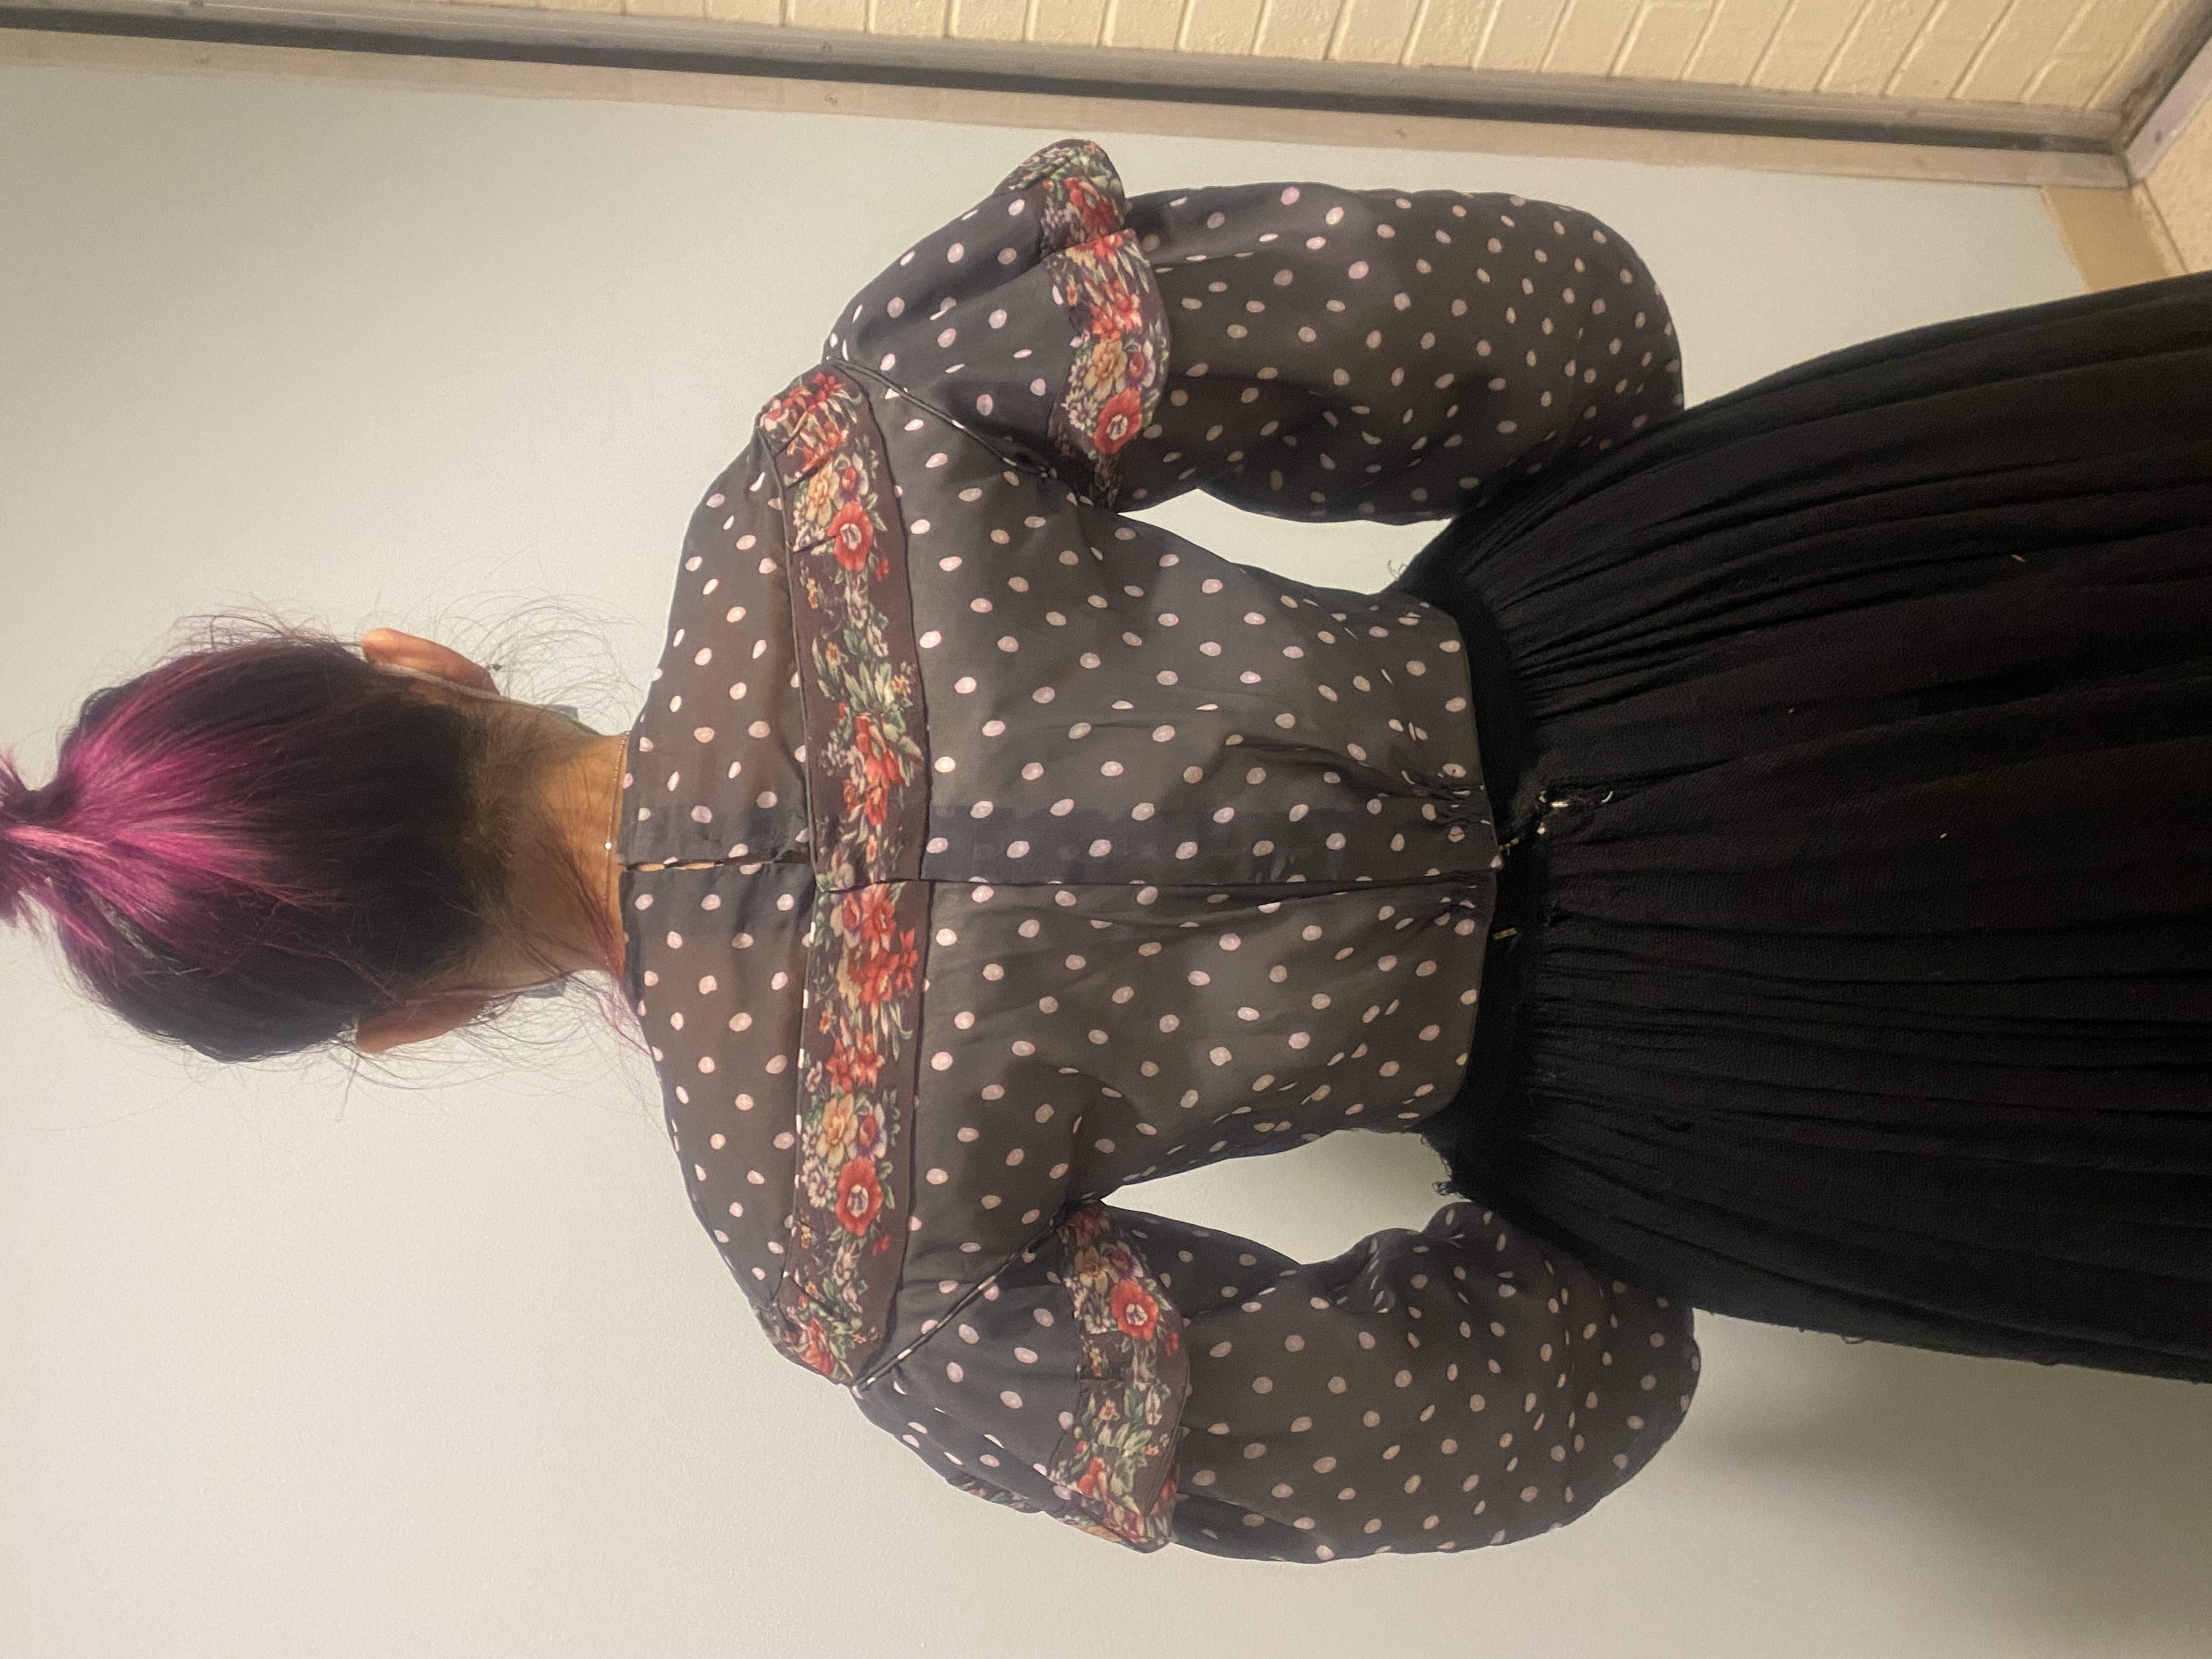 |
With the assistance of technology, the historical and modern version of the bodice appear very similar. When used as a costume in a theatrical setting, it would be hard to disseminate the differences between the reproduction and the original.
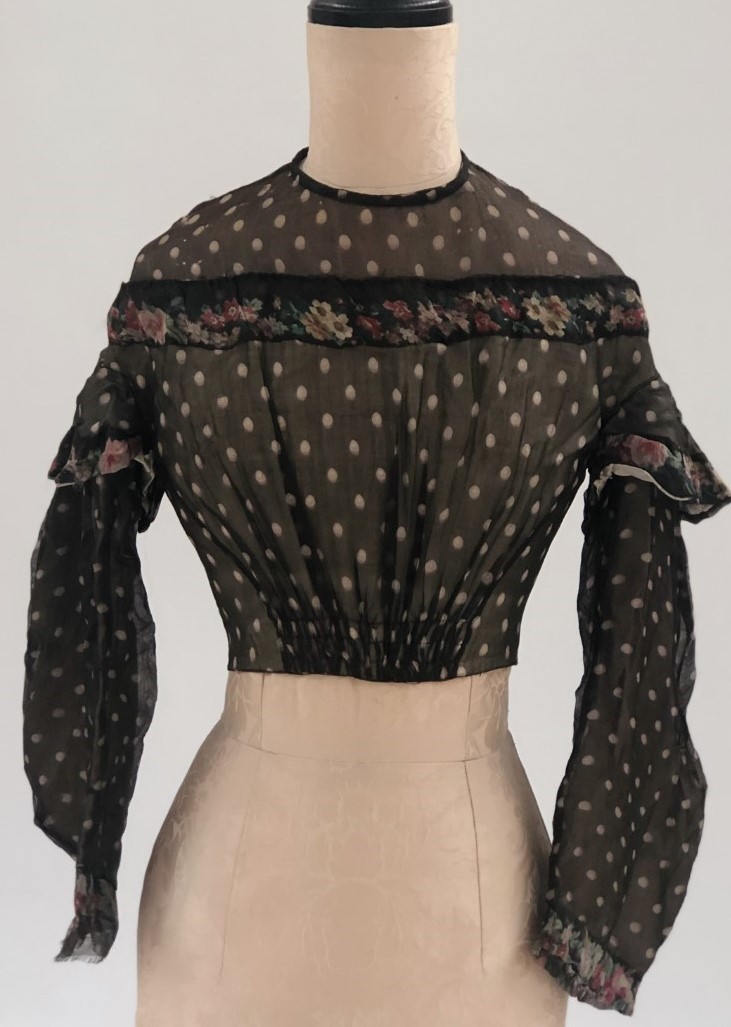
Figure 9: Original Front |
Figure 10: Original Back |
 |
 |
© Ellen Cornette, 2022