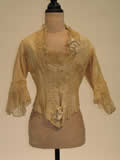


The off-white bodice is thought to be part of a wedding ensemble from the 1880s. A tight fitting bodice, shaped with darts, was a common silhouette of the period, and it occurs in this bodice. It was also popular to see a two-texture ensemble during the time period. This is used in the outer two fashion fabric layers of the bodice, which is constructed with three layers of fabric. The inner most layer, the lining, is a white cotton twill. The outer fashion fabrics are silk broadcloth with a silk organdy overlay. There is no indication that the silk organdy overlay, silk broadcloth, and cotton lining were flatlined in the construction process. It seems that all three layers of fabric in a pattern piece were simply places together and sewn all at once with no security hand or machine stitches. All seams are sewn with a machine chain stitch, including the dart’s casings.
Construction Details
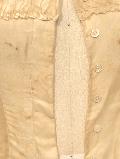
The front of the bodice is shaped with two internal darts, the first being 3” from center front, and the second placed 1 1/2” past the first, towards the side seam. Bone casings are formed within the fabric allowance of these two darts. Steel bones, measuring 8 3/4” in the dart closest to center front and 9” in the dart closest to the side seam, are placed in these bone casings. Both bone casings have a hand tack at the top of the bone to keep them from shifting. The center front of the right side of the bodice has been turned back 1” using the selvage seam finish, and a button flange has been applied. The button flange was created by using the selvage edge of the fabric, cutting a 2 1/2” piece of fabric from the selvage edge, and folding the fabric to create a 1” wide, 13 1/2” long flange (see Figure 1). There are nine hand worked button holes within the flange. The first buttonhole starts 5/8” from the top of the flange with the next eight button holes spaced 1 1/2” apart with 3/8” of flange left after the last buttonhole. The flange was applied with a machine chain stitch and is visible on the outside of the bodice. Between every buttonhole, the flange has been tacked down to the front of the bodice with a hand tack (see Figure 2). Center front, on the left side of the front bodice, uses the selvage of the cotton finish of the button extension with the organdy extending past the selvage edge, turning back 1/4”, and hand stitched with a prick stitch to secure the fabric in place. There are nine mother-of-pearl buttons placed to match the buttonholes on the right side of the garment.
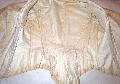
The back of the bodice has a six piece fiddle-back shape, formed by the pattern pieces of the garment. The center back seam has been turned towards the left side of the garment, and the seam allowances have been finished with a hand overcast stitch. The seams at either side of center back, also finished with a hand overcast, are both turned outward to their respective right and left side seams. The side seam allowances are open, clipped, and have not been finished. There is an 8” bone casing applied with a hand whip stitch on both side seams. The steel bones within these casings also measure 8”. The seam beyond the side seam towards center back is open and these seam allowances are also unfinished. These seams also have bone casings applied with a hand whip stitch that is 10” long. The steel bones within these casings are 9 1/2” and have a hand tack at the top to hold them in place.
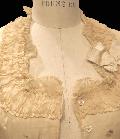
The entire shaped hemline of the bodice has been finished with a cording covered in just the organdy. It appears that the cording was applied by machine, turned to the inside and then secured with a hand whip stitch. The bodice has a square neckline that is finished with a 1/2”, hand applied piece of bias silk fabric that has been folded in half; the fold on the edge of the neckline with 1/4” extending to the front and back. There are also two layers of trim placed at the neckline of the bodice (see Figure 3). The under layer is 1/4” pleated frill that extends 1” past the neckline and is hand applied with a running stitch. The hem of the pleats was finished by machine. Each pleat has been caught with a hand pricked backstitch to hold the shape of the pleating. The over layer was achieved by using a 3” piece of organdy and turning back each side 1/2” so that it had a finished size 2”. This piece was then hand ruched and applied by hand using a running stitch. On the left side of the bodice, this trim has been seamed by machine.
The shoulder seam of the bodice extends 1” past the true shoulder seam at the armhole creating a seam that slants towards the back of the bodice. These seam allowances have not been finished, and are both turned towards the front of the bodice.
This bodice has a two piece sleeve with minimal ease in the cap. The seam allowances in the sleeve have been finished with a hand overcast stitch. The under sleeve section of both sleeves have been pieced, exposing the cotton lining to the outside of the garment (see Figure 4). There are four rows of stitching where the sleeve is placed into the armhole, two rows of hand stitched, and two of machine stitches. Looking at these closely, it seems that the cording was applied by machine to the bodice; the sleeve was then basted in by hand followed by a machine stitch, and finally a nice hand running stitch to ensure a nice look where the cording brings the sleeve and the bodice together. The seam allowances in the armhole are trimmed and finished with a hand overcast.
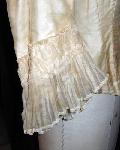
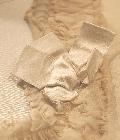
The hem of the sleeve has been turned up leaving 3/4” seam allowance inside. This 3/4” has also been turned over and hand whip stitch to the sleeve, making it impossible to see how much extra fabric is turned back without opening the hand stitches. Three layers of trim have been placed at the sleeve hem (see Figure 5). The inner most layer was a frill of crystal pleats that were bound by bias tape (by machine) then hand applied with a whip stitch right inside the hem of the sleeve. The middle and outer layers mimic the trims at the neckline. The middle layer is the 1/4” pleating, also applied by hand. It also has hand pricked, backstitches to secure the pleats, as well as the machine finished hem. At the underarm, the pleating has been joined with a hand stitch. The length of these pleats differs in the upper and under section of the sleeve. At the upper section, the frill measures 3 1/2”, and at the under section, the frill measures 2 1/2”. The final layer is another 2” ruched piece of organdy. It was constructed and applied the same as the ruching at the neckline. Hand tacked, and butting up to the armhole in the interior of the front bodice, there are eggs in the shape of a crescent. These eggs are stuffed slightly, and placed into the bodice to fill empty space between the body and the garment. This empty space was usually created by the corset that would have been worn under the garment. The eggs were added to give shape to the garment (see Figure 6). There are two ribbon flowers that appear on this bodice. One is located on the upper left neckline of the bodice, and the other at center front on the right side of the bodice towards the hem. The flower at the hem had been applied by hand, while the flower at the neckline is straight pinned to the garment.
Condition
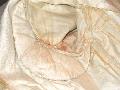
There is some damage throughout this bodice. There are many external tears and stains. On the interior, the underarms are sweat and/or makeup stained, as well as the eggs (see 'Detail of underarm pad' on the left). There is much discoloration at the interior neckline at the back of the bodice, which appears to be water damage (see Figure 8). The interior crystal pleated sleeve frill is disintegrating and much is gone (see Figure 9).
Measurements and Pattern
The actual measurements of the bodice are:
- Center front length: 14 1/2''
- Dart 1 length: (dart closest to center front) 11"
- Dart 2 length: 10"
- Center back length: 21 1/2"
- Seam 1: (working from CB toward the side seam)15 3/4"
- Seam 2: 10 3/4"
- Side seam: 9 1/4"
- Shoulder seam: 7"
- Armhole: 16"
- Back seam of sleeve: 10 3/4"
- Front seam of sleeve: 6 3/4"
The pattern was drafted wtih a scale of 1/8" = 1" and the modern reproduction created using couture methods.
© Becky Hyatt, 2005